The GPIO0 'enable' button is usually only used at boot to put the device into flash mode. After it has booted, we have a spare physical button on most dev boards. We can use this to flag that ESPHome needs to go into safe mode (ie, not run any components other than wifi and ota). We need to add an ID to the ota component: ota : id : theota password : "(readcted)" Then add the following YAML globals : - id : press_ms type : int binary_sensor : - platform : gpio id : failsafe pin : number : 0 mode : input : true pullup : true inverted : true on_press : then : lambda : !lambda |- id(press_ms) = millis(); on_release : then : lambda : !lambd...
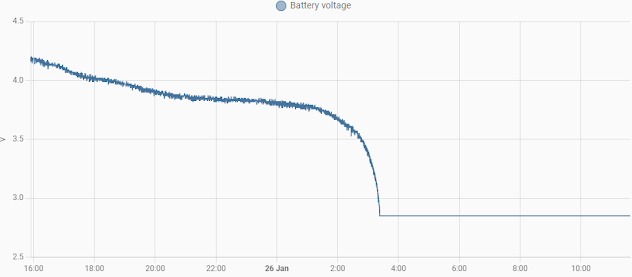
I think my ESPNow proxy components are now working well enough to release. https://gitlab.com/ripnetuk-public/espnow/ripnetuk-esphome-easynow It can be used in ESPHome simply by adding YAML, since ESPHome can pull external components direct from a Git repo - well done ESPHome :) Initial tests are good - using the same device that I was getting roughly 8 hours out of (from a discarded [popular device] - 700maH), On previous measurements, I was timing the main part of the discharge curve, from 4v down to 3v, and was getting approx. 8-9h of runtime. This was taking a reading every 60s and passing to HomeAssistant via the regular API (ie, using the built in ESPHome stuff) BEFORE Easynow So it was taking between ~18:00 to ~02:45 to discharge from 4v to 3v. Thats about 8/9 hours. WITH Easynow Well, this is awkward. Its worked so well that after 8 hours, it havent even yet got down to the 4v ive been testing at: yet its still successfully reading the temperature every 30s: So far, id cal...
Bought a Logitech MX master 3s mouse 2 and a half years ago. It was very expensive, but looked like a "mosue for life". It was everything I wanted in a mouse, as well as being a very good basic mouse, it had a great inertial scroll wheel, and the extra buttons worked brilliantly via their great windows app. But the best thing was, the multi device support works. For this first time in recorded history, I had a device that reliably roamed between 3 computers. I liked it so much that I invested in another "for life" splurge, the MX mechanical keyboard, which also has the perfect conectivity of the mouse. I also bought 2 more bolt receivers as I loved the eco system. Fast forward 2 and a half years, and the left button on the mouse stopped working. OK I thought, this is a young, premium mouse, logitech will sort me out. No. Their support bot eventually put me through to a human, and the first message I sent was " hi. i bought a mx master 3s in oct 2022 for 135 po...
Comments
Post a Comment