SSD Upgrade on Lenovo Legion Go - Part 1 - Backup the original drive using Veeam
0. Prerequisites
a) An adapter to allow you to plug USB devices into the Legion Go. I used this from Amazon:
https://www.amazon.co.uk/dp/B09H44S96B?psc=1&ref=ppx_yo2ov_dt_b_product_details
If you buy this adaptor, make sure you plug the drive into the 1 out of the 4 USB ports that supports USB 3 :)
b) An external drive big enough to hold the Legion Go SSD (in my case, 512Gb). I use a Samsung SATA SSD in a USB3 cage, since that is what I have.
The windows ISO is only needed if the computer doesn't have a recovery partition, which the Legion Go DOES, so this is not needed here.
1. Plug in a blank USB stick for the recovery media
2. Download Standalone Veeam Agent for Microsoft Windows here:
https://www.veeam.com/windows-backup-download.html?sec=windows-backup-download.html&subsec=&part=&item=
You will need a Veeam account (free), and read the note:
"
Note: when the 30-day license period is over, standalone Veeam Agent for Microsoft Windows will operate in FREE Edition mode, Veeam Backup & Replication will revert to Community Edition mode. To continue using the full functionality please contact Sales. No software reinstallation required.
"
Community edition is plenty for what we want here.
3. Install it onto the Legion Go [LEGO]
Just unzip the download, and run the installer, accepting defaults
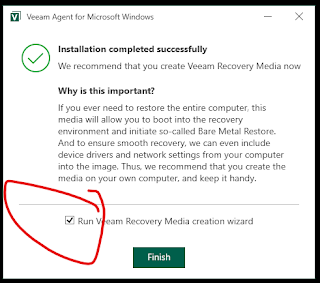
4. Accept the option on install to "Run Veeam Recovery Media creation wizard"
This will create a .iso that you can "burn" to a USB stick to restore to a completely blank new SSD
Pick the USB stick (you can see its the right one from the size):
Click next.
Accept the warning that the USB stick will be wiped (double check you have the correct drive!)
Click Create
Wait for it to finish...
5. Remove the USB stick
and keep it aside for the restore phase. I use a sharpie to label it.
6. Run Veeam Agent for Microsoft Windows and backup the internal SSD (this takes ages... at least for my choice of USB adaptor and external drive :( )
Click No to installing a license file (as we are only using free functionality here)
Once Veeam has loaded, click on the burger bar at the top left (the 3 _ symbols above each over) and click Add new job:
Backup Mode - Entire Computer and NOT include USB drives
On the Schedule tab, unclick daily (we are going to do a one-off manual run of this here)
Destination - Local Storage
When you get to Local Storage, pick your large external drive to backup to:
On the summery tab, click "Run the job when I click finish"
Click finish, and wait for it to complete the backup to the external drive.
7. When it has finished, safely eject and remove the external USB drive
Next step would be to fit the new SSD into the Legion Go, boot from the USB stick you made earlier, and restore.
I am waiting on my new SSD to be delivered (will arrive tomorrow), so will write that up once ive tried it.
To be continued...


Comments
Post a Comment