Posts

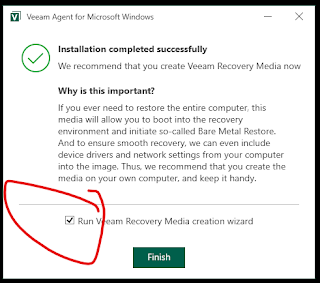
SSD Upgrade on Lenovo Legion Go - Part 2 - Restore backup

Image
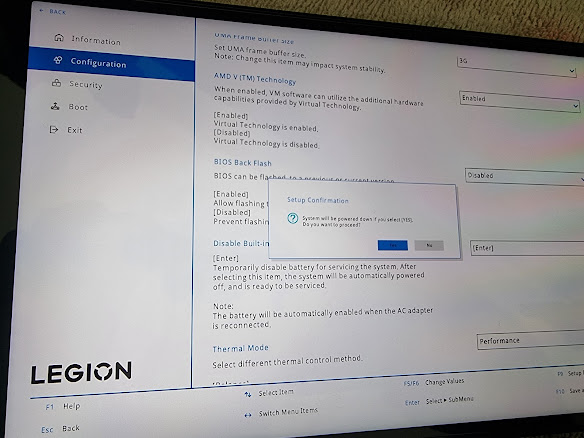
 TL;DR; - It worked perfectly as expected. 0. Prerequisites Same as part 1 2. Go into BIOS and disable internal battery (to disconnect the internal battery until external power is applied). Also disable secure boot. 2. Replace the SSD in the device. I bought one of these: https://www.amazon.co.uk/dp/B0C5YS3QY4?psc=1&ref=ppx_yo2ov_dt_b_product_details and the adaptor to make it long enough for the Legion Go https://www.amazon.co.uk/dp/B0BLJNGGVD?psc=1&ref=ppx_yo2ov_dt_b_product_details The hardware swap is well documented elsewhere. The hardest part was removing the foil from the old drive. 3. Insert the USB stick prepared earlier with Veeam and activate the boot menu (vol+ while power on, select boot menu. Also attach the large external drive with the backup image from before. 4. Boot from the USB stick prepared with Veeam 5. Wait for quite a while while it boots... 6. Pick bare metal recovery 7. Backup location - local storage... next... 7. Restore mode - entire computer (NB Y

SSD Upgrade on Lenovo Legion Go - Part 1 - Backup the original drive using Veeam

Image
0. Prerequisites a) An adapter to allow you to plug USB devices into the Legion Go. I used this from Amazon: https://www.amazon.co.uk/dp/B09H44S96B?psc=1&ref=ppx_yo2ov_dt_b_product_details You might want to do some research on this - its doubled in price since I bought it last week, and its very slow (25Mb/s to the external SSD which can do 500Mb/s, but it might be the cage) If you buy this adaptor, make sure you plug the drive into the 1 out of the 4 USB ports that supports USB 3 :) b) An external drive big enough to hold the Legion Go SSD (in my case, 512Gb). I use a Samsung SATA SSD in a USB3 cage, since that is what I have. c) A Windows 11 iso. This can be downloaded from Microsoft (this is used to create the recovery media) The windows ISO is only needed if the computer doesn't have a recovery partition, which the Legion Go DOES, so this is not needed here. 1. Plug in a blank USB stick for the recovery media 2. Download Standalone Veeam Agent for Microsoft Windows here: ht

Wago is down - 500mah lasts 13.5 days reading the temp every 240s.

Image
  The blue line is the AZDelivery device, measuring the temperature every 240s on a 500maH ecig battery. It lasted 13.5 days. Its now going into production with a brand new 3000maH battery pack.

Man down...

Image
  Lithium is down after about 5 and a half days. This is the AZDelivery board with 70K potential divider, measuring every 60s. Ladybird (Firebeetle with 1M potential divider) isnt far behind. Wago (same as Lithium but measuring every 240s) is still on 3.78v after 8 or so days. These are all on a 500maH cell. conclusion so far: The Difference made by moving from a AZDelivery board and lower resister values doesn't make a huge deal of difference (half a day on about 5/6) The difference between measuring every 60s and every 240s is huge (not yet concluded) I will let this finish, then re-measure lithium and ladybird on a 240s schedule to see how they fare. edit: Ladybird is also down now, so the Firebeetle didn't really make a notable difference (nor did the higher resisters in the voltage measurement hack). We got an extra 5 hours on top of 5.5 days. It will be interesting to see if in a more sleepy (ie, every 240s) configuration the famed low power consumption of the Firebeetle

Race update

Image
Running the firebeetle (ladybird) and the AZDelivery boards, update every 60s (and also Wago which I didn't recharge before this). After 48h

Measuring the firebeetle

Image
Results (unscientific - should have done multiple tests)               Awake (ma)           Asleep (ua) AZDelivery board 70K dividers 130ma 115ma Firebeetle without low power link broken 70K dividers 130ma 462ma Firebeetle with low power link broken 70k dividers 132ma 84ua Firebeetle with low power link broken. 1M dividers 132ma 59.7ua So.. on the AZDelivery board I was seeing (at the battery input) Running current: 130ma Deep sleep current: 115 μa Measuring the firebeetle: Running current: 130ma Deep sleep: 462μa?????? Im not sure I trust my multimeter - i am inexperienced in measuring currents, and I suspect it breaks the circuit when it goes out of range, which makes it hard to measure micro and milliamps in the same rig. Trying another way - connecting a 4.7 ohm resister in series with the battery, and measuing the voltage across it, (measured reister = 5.1 ohms) Running: 660mv so I=V/R = 0.660 / 5.1 = 0.129a which isnt miles out from the 115ma above Deep sleep: 2mv so I=V/R = 0.00

Passing though a USB3 PCI card in hyper-v so I can do full JTAG debugging in a VM

 By far my most powerful build box is my Dell R720 which im using as a Hyper-V  host. Ive got a lovely Wrover Kit dev board, which has on-board JTAG debugging, but to use it ive historically had to plug it into my laptop, and build there. The laptop is a 4 core i5, so it takes forever to build and deploy, and the progress is no fun. Ive managed to successfully pass though a PCI USB card to the virtual machine I usually use for ESP32 dev, and it works brilliantly https://community.spiceworks.com/how_to/189969-hyper-v-pcie-including-usb-pass-through-not-just-graphics-devices?from_category=22 PCIROOT(0)#PCI(0200)#PCI(0000) Dismount-VMHostAssignableDevice -LocationPath 'PCIROOT(0)#PCI(0200)#PCI(0000)' -force Add-VMAssignableDevice -LocationPath 'PCIROOT(0)#PCI(0200)#PCI(0000)' -VMName 'v-dev' This gives me full remote control of the device via both serial and JTAG. The only thing I cant do is see the screen, but I dont use that much.